Tagging Players and Content
Overview
Tagging is an extremely useful feature that lets you enforce unique content playback rules. In a nutshell, you assign meta tags to players based on your needs (for example, you could use a tag to indicate a player should only be playing content in a particular language, or of a specific nature). Next, you assign tags to your content according to their intended use. An ad could be tagged with the word “english” or “HQ” to ensure it either plays on specific players, or is excluded of specific players. Both options are available, so you have complete control over the location where content will appear.
Tagging works with your QL group and sub-group hierarchy. If you tag content assigned to a top level group, you can use this content anywhere in your network and use tags to ensure it’s only visible where you want. English content plays on english screens. HQ content only appears on employee facing screens, and so on…
Meanwhile, all “untagged” content in a playlist will play on all players.
Tagging is one of the many programmatic features available in the QL software platform.
Click here for the Tagging / Location Specific Content video tutorial.
How does tagging work
Here is an example illustrating how tagging works.
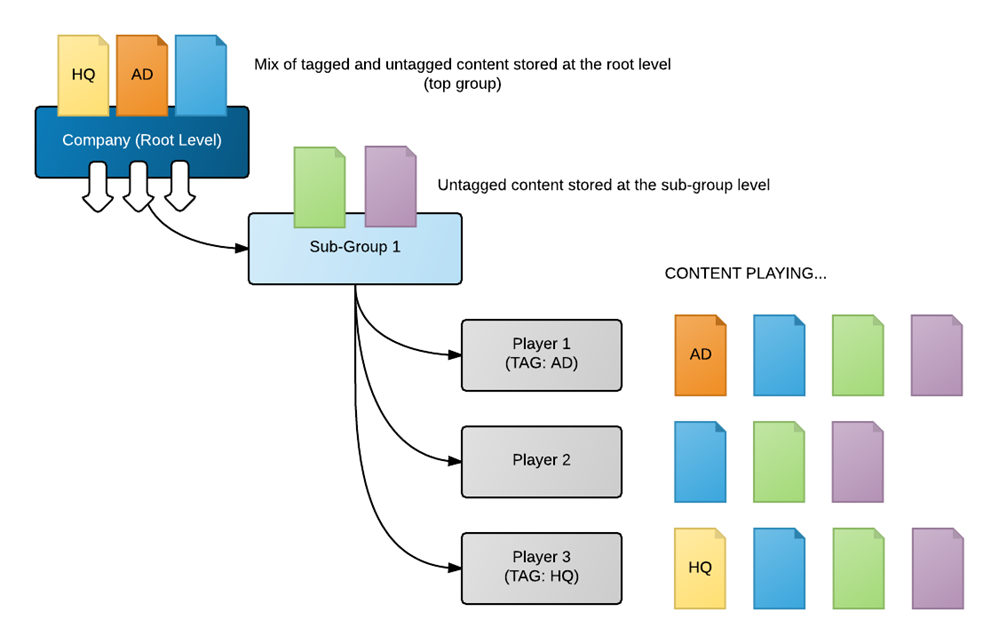
In the example above, we have a mix of content (tagged and untagged) stored at the top (root) level. We also have some untagged content stored at the sub-group level, where the players are located. Assuming that we have the same playlist with all the upper and lower level content programmed, the players will display content as follows:
Player 1: all untagged content, both local and global + any content tagged with the word: AD
Player 2: only untagged content, both local and global
Player 3: all untagged content, both local and global + any content tagged with the word: HQ
Creating new tags
To create new tags, proceed as follows:
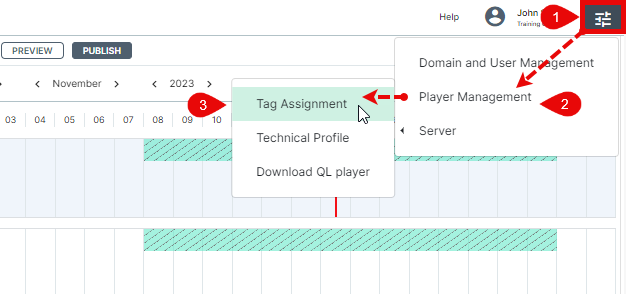
- Slide your cursor to the Main Menu button in the upper right corner of your screen.
- Slide your cursor up to the Player Management menu option,
- Slide your cursor over and click the Tag Assignment option.
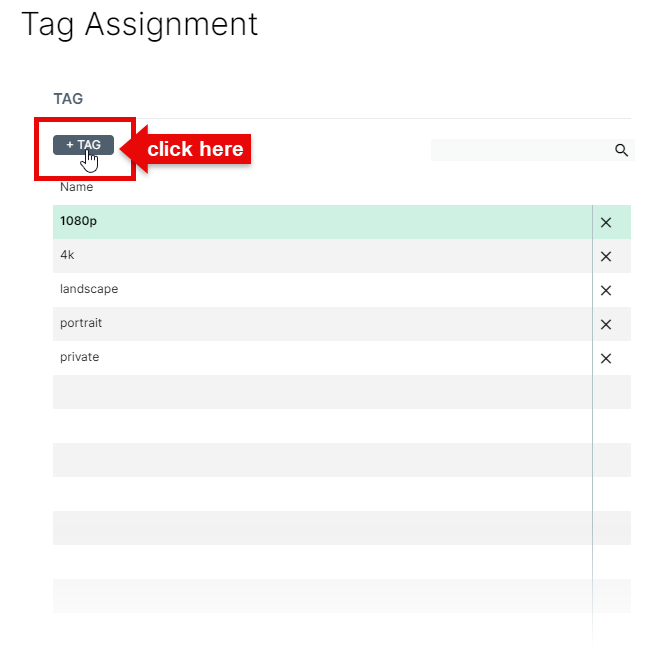
The Tag Assignment window
The Tag Assignment window is divided into 5 main areas.
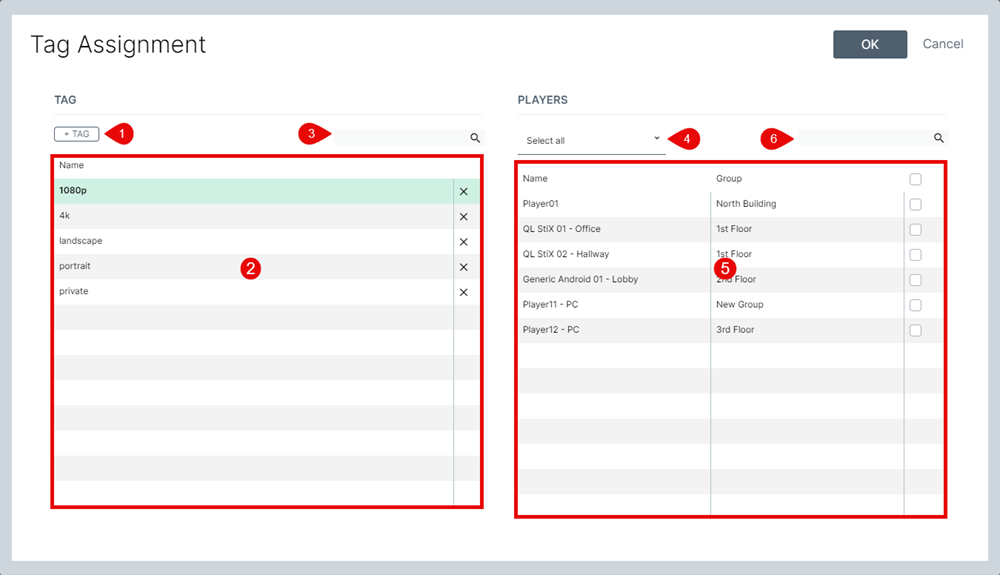
- Create Tag button (+ TAG).
- Tag name table lists all the tags that have been created.
- Search fields. Use the left field to search for tags and the right field to search for Players.
- Player group filter. Click this pull down menu to select which group you wish to see in the table below. Default is "Select all".
- Player table lists the player names the user has access to.
- Search field. Use this field to filter the result of the player table.
Creating tags
Click the + TAG button.
The Tag Assignment window will open.
Click in the field where it says "Value" and type the tag name you wish to assign.
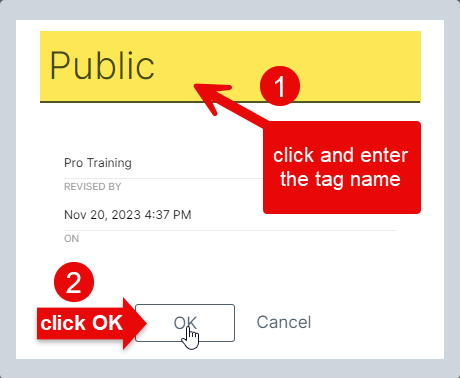
Click OK to confirm.
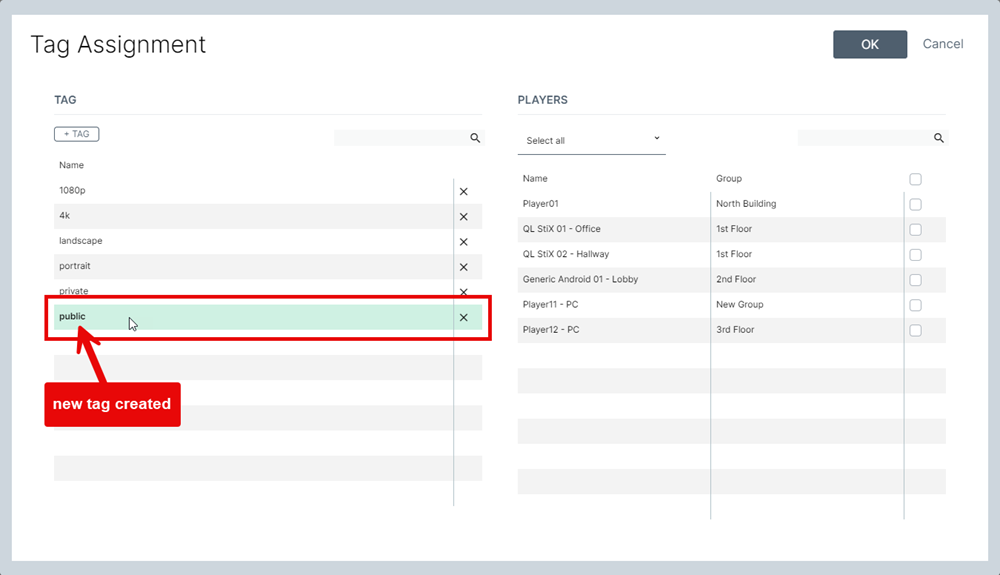
Your new tag will appear in the table below.
You can create as many tags as you need in this window.
Create as many tags as you need, and remember tags can be combined to achieve unique scenarios.
Using tags
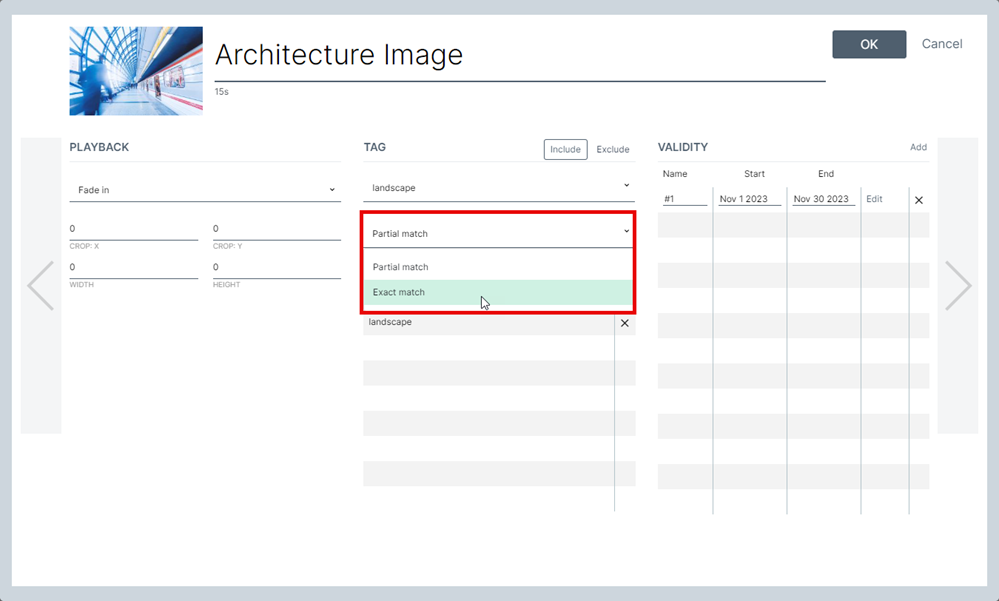
Using the example above, you could assign tags to ensure the right content is always shown on the right screen. Let's say you have content that is destined to your staff members and different content you want to show to your customers. You could tag the sensitive content as "Private" while advertising and other customer facing screens would be shown content tagged as "Public". The same goes for screen layouts where you can use "Landscape" and "Portrait" to tag content according to their intended orientation.
Content tagged as Public and Portrait can be shown on Players that have either or both of these tags assigned. You control this in the Content properties by selecting Partial or Exact match.
Linking tags to players
Click a tag from the TAG table on the left side. Next, check the box for each player you wish to assign this tag in the PLAYERS table on the right.
To assign a tag to all the players at once, click the box at the very top of the table.
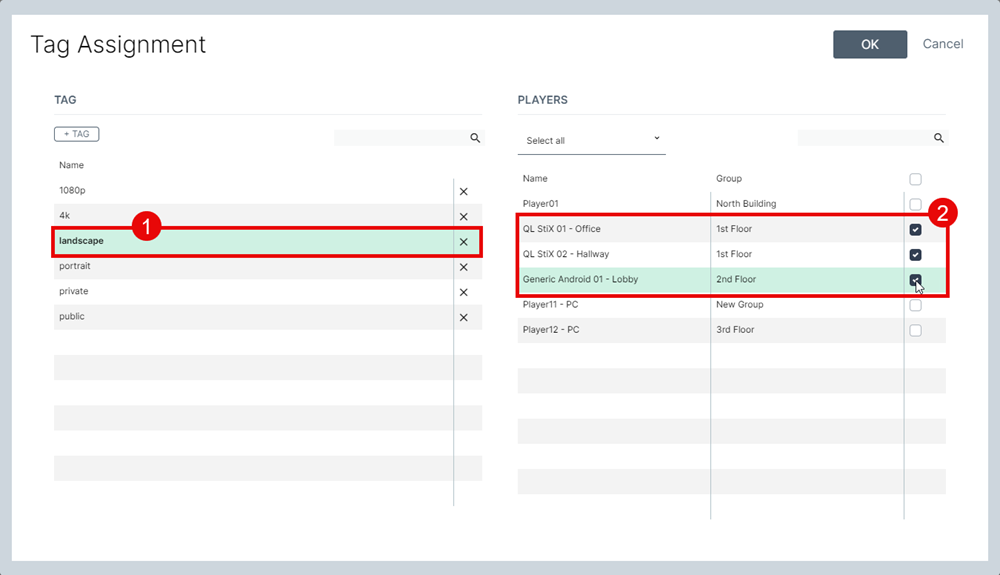
If you want to assign another tag to the same players, repeat the process until you are done.
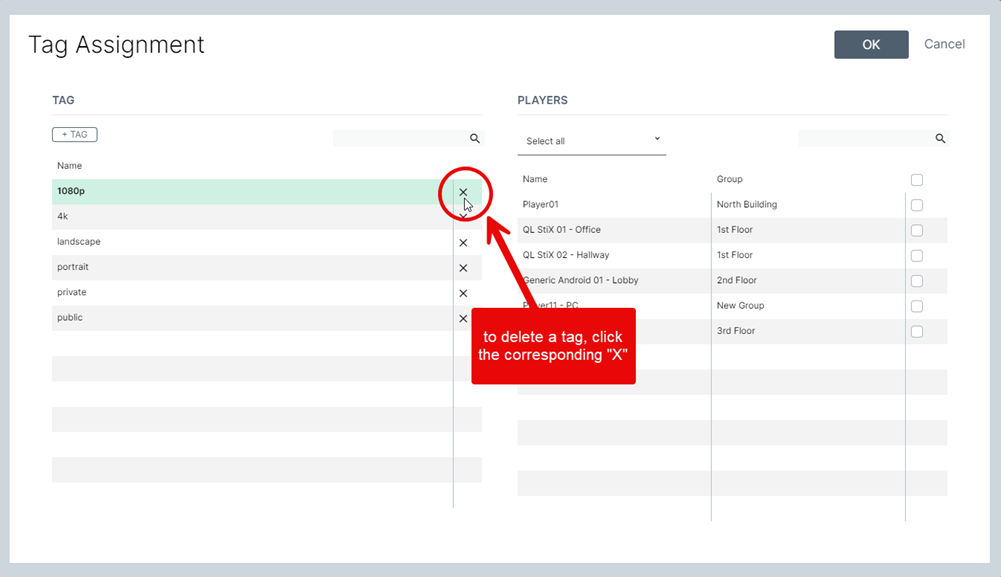
Deleting tags
To delete a tag, click the corresponding "X" in the right column.
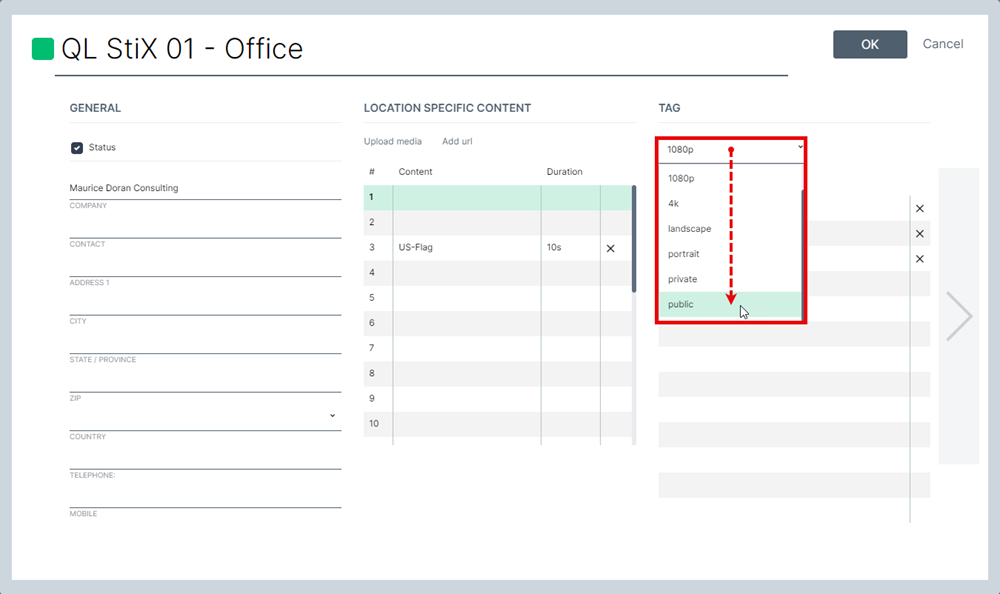
Assigning and removing tags for individual players
While you can't create tags at the Player Property level, you can assign and remove tags already created in the Tag Assignment window for individual players.
Double click any player name to open its properties. The TAG section is on the right.

You will see all currently assigned tags in the table.
To remove a tag click the corresponding X in the right column.
To assign a tag click the Select pull down menu and scroll down the list of available tags.
IMPORTANT!
In order to be useful, tags must also be assigned to your content (this includes any media files, web URLs, streaming video, HDMI input and templates).
There are additional options you can select when you assign tags to your content, such as if tagged content should be included (shown) or excluded (skipped), and if more than one tagged is assigned – require one or all tags to be present in order for the content to be shown.
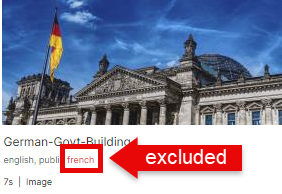
Identifying tagged content
Assigned tags are shown under each item's name in the Content Library. Red tag names indicate "exclusions".
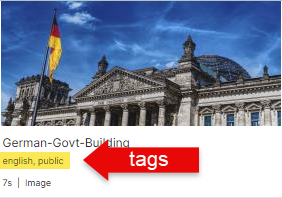
Red tag names indicate "exclusions". Excluded tags mean the content will not play if there is a match between the player and the content tag.