The Data Feed Manager
The Data Feed Manager is where you add, configure and remove data feeds.
QL supports the following types of data sources:
- RSS / XML / JSON*
- Media RSS (with links to images)
- QL Server hosted data feeds
- Twitter/X feeds
- Facebook feeds
- Google Calendar feeds
- Microsoft Exchange data feeds
*Simply use the RSS/XML option to add a JSON data feed.
Please Note: The Data Feed Manager uses external connectors to configure Twitter/X, Facebook, Google Calendar and Microsoft Exchange feeds. Click on one of the links above to be redirected to the Navori Extranet FAQ article for detailed instructions that will guide you in each connector's configuration.
You can access the Data Feed Manager from the Content Library, the Template Designer or the Ticker Designer:
***IMPORTANT INFORMATION ABOUT DISPLAYING DATA FEEDS ON YOUR SCREENS***
You must configure each data feed using QL Server's Data Feed Manager. Once each feed has been configured, the data feed's link will be sent to each player that needs to display the information. It's important to remember that each player must be able to access the data feeds source from their network location. In some instances, this may require configuration of a proxy server or other method to let players connect to the data feed's source.
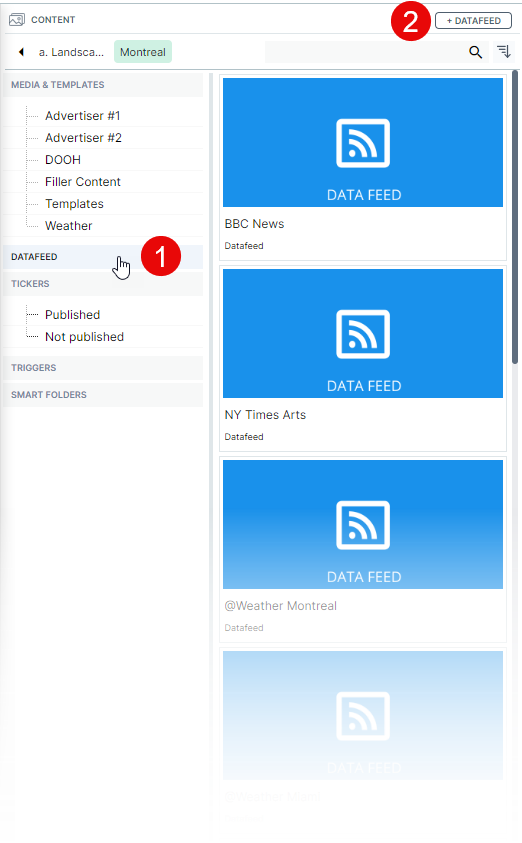
Accessing the Data Feed Manager from the Content Library
- Click the DATAFEED tab on the left side of the Content Library. All existing data feeds will appear on the right.
- Click the +DATAFEED button at the top of the Content Library window to open the Data Feed Manager in new feed mode.
Accessing the Data Feed Manager from the Template Designer
With the Template Designer open, click the DATA FEED MANAGER tab on the right. Click the Data Feed Manager button to open the DFM window:

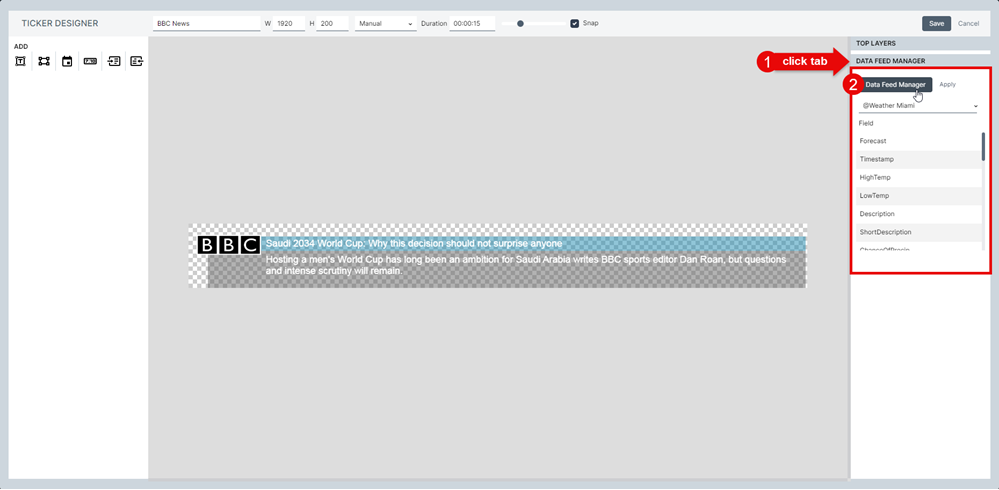
Accessing the Data Feed Manager from the Ticker Designer
With the Ticker Designer open, click the DATA FEED MANAGER tab on the right. Click the Data Feed Manager button to open the DFM window:
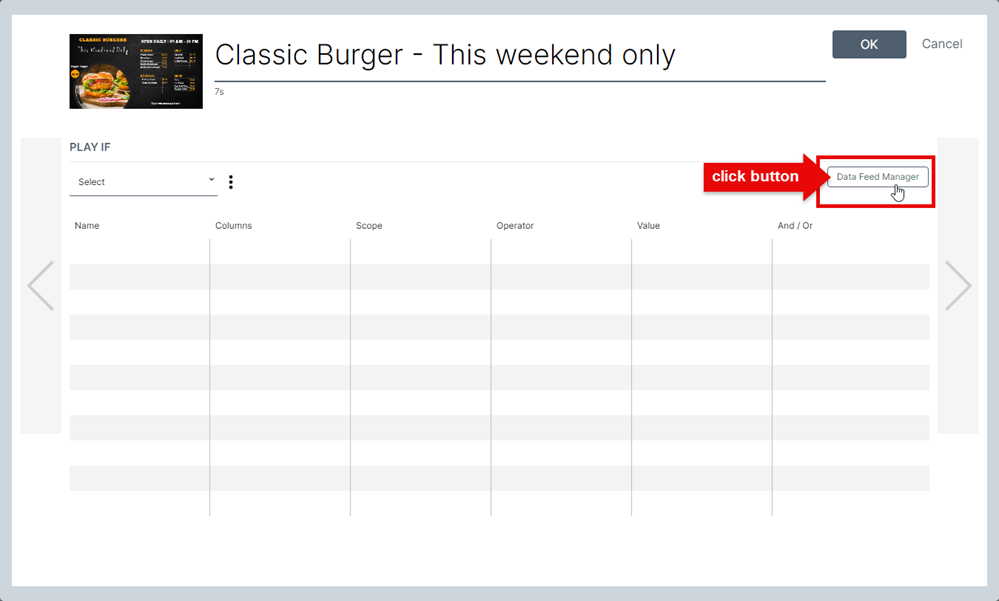
Accessing the Data Feed Manager from the Content Properties (via Play If conditional playback or Trigger)
In any content or template properties (3rd screen), click the Data Feed Manager button:
Data Feed Manager Tour
Configuring a new Data Feed from the +DATAFEED button:
Click the + DATAFEED button to start. The Data Feed Manager window will open.

- Select the data feed type:
- RSS-XML
- QL Server feed
- Microsoft Exchange feed
- Facebook feed
- Google Calendar feed
- X (Twitter) feed
- Enter a descriptive name for the new data feed.
- For any data feed type other than QL Server feed, enter the URL including http:// or https:// prefix. For Twitter / X, enter your handle (user name). Be sure to include the @ sign.
Configuring a new Data Feed from the Template Designer, Ticker Designer or Content Propreties (Play If or Trigger):
Click the Data Feed Manager button to start. The Data Feed Manager window will open above the Template Designer.

- New +: Click this button to open the New Feed setup window.
- Select the data feed type:
- RSS-XML
- QL Server feed
- Microsoft Exchange feed
- Facebook feed
- Google Calendar feed
- X (Twitter) feed
- Enter a descriptive name for the new data feed.
- For any data feed type other than QL Server feed, enter the URL including http:// or https:// prefix. For Twitter / X, enter your handle (user name). Be sure to include the @ sign.
- Ellipsis icon: Hover on the three dot symbol to display the Remove and Refresh options.
- Remove: Deletes the currently selected data feed.
- Refresh: Refreshes the data in the currently selected data feed.
- Settings: This is where you configure the data feed's parameters (Name, Referent, Data Refresh interval, Restrict Scope and other options)
- Filter: This is the lookup filter you can configure to only show specific information contained in any QL supported data feed.
- Sort: Lets you sort the information shown in the data feed table. You select the sort column and then the sorting order (ascending/descending).
- Data Feed Type tabs: Data feeds are grouped and organized by type. Click on a tab to view the feeds of each type.
- Data Feed table: This is the table view of the selected feed. Information is displayed in columns.
- Record view: Lets you view the data as individual records. You can click on a line in the table or use the selection arrows to navigate the records.
- Save your data feed's parameters.
View when opening a feed from the Data Feed tab in the Content Library
You will notice there are less options available when you open an existing data feed from the Content Library. In this view, you are accessing a single feed (there is no tab view on the left to view the other feeds).

- Settings: This is where you configure the data feed's settings (feed name, URL, etc...)
- Filter: This is the lookup filter you can configure to only show specific information contained in any QL supported data feed.
- Data Feed table: This is the table view of the selected feed. Information is displayed in columns.
- Record view: Lets you view the data as individual records. You can click on a line in the table or use the selection arrows to navigate the records.
- Save your data feed's parameters. The data feed will be synchronized and its contents will be shown in the empty pane on the right.
Creating a new data feed from within a template, ticker or conditional play/trigger rule
Click New + near the top of the Data Feed Manager window.
The menu will open.

Type: Select a data feed type from the list.
- RSS-XML
- QL Server feed
- Microsoft Exchange feed
- Facebook feed
- Google Calendar feed
- X (Twitter) feed
Name: Enter a descriptive name for the new data feed.
URL: For any data feed type other than QL Server feed, enter the URL including http:// or https:// prefix. For Twitter / X, enter your handle (user name). Be sure to include the @ sign.
Ellipsis (options)

- Remove: Deletes the currently selected data feed.
- Refresh: Refreshes the data in the currently selected data feed.
Settings

Name: The data feed's name.
Referent: Each data record will be displayed on screen based on the number of characters in the column listed as Referent. Always pick a referent column that has the most text. For example, most publicly available news RSS feeds feature a title and a description column. Title is almost always a single line of text, while description is a complete paragraph. By default, QL always selects the first column in any data feed as the referent so it’s important to check and make sure the referent points to the column with the most text. Otherwise the news will cycle too quickly and viewers won’t have time to read the information on the screen.
You can access the Referent in the Data Feed Manager via Settings.

NOTE: You can also adjust the pause between data records in the Template and Ticker designers, by modifying the Reading Speed value, under “DATAFEED“.

Refresh: The refresh value is set to 30 minutes by default. Changing this setting will vary the frequency at which the player will connect to the data source to refresh the data.
Restrict scope: By default, all the records in the data feed will be shown. By changing the start and end values, you can restrict the number of records for any data feed. For example, start on line 5 and stop on line 10. This setting can be modified in the Template and Ticker designers, or when you open a datafeed in the DATAFEED tab.

Restrict scope: By default, all the records in the data feed will be shown. By changing the start and end values, you can restrict the number of records for any data feed. For example, start on line 5 and stop on line 10.
This setting can be modified in the Template and Ticker designers, or when you open a datafeed in the DATAFEED tab.

Options (Image within a cell/Ignore HTML code/Data Persistence)
Image within a cell: This selection indicates that URLs pointing to images stored on a web server will be interpreted as images. If you deselect this option, images embedded within your media RSS feeds will no longer be displayed. This option is always selected by default.
Ignore HTML code: Sometimes RSS and XML data feeds include HTML code which can alter the way the text is displayed. When you select this option, HTML codes will no longer be interpreted as code. They will be displayed as text.
Data Persistence: Caches the data on the media player device so the last received information is displayed in case of loss of connectivity.
Filter (Columns/Operator/Value lookup settings)
Use the filter feature when you only want to show some information contained in any QL supported data feed.
For example, you can create a filter that will only show news items that contain a specific word (ex. "Chicago"). All other items will be ignored.

- There are 3 filters you must configure:
- Columns: Select the column to filter on.
- Operator: Select one of the following operators.
- Contains
- Contains data
- Does not contain data
- Ends with
- Starts with
- Greater than
- Greater or equal to
- Lower than
- Equals
- Value: Enter the value for this operator. In this example, selecting "Contains", "Chicago" would exclude any record that does not have the word "Chicago" in its Title column. Note, this will not change the information you see in the Data Feed Manager. Only the information shown on your screens will be filtered.
- Click Add filter to add additional conditions to fine-tune your results.
Record view
You will find the record view window on the right side of the data feed manager. This lets you navigate individual records within the selected data feed.
Use the left/right arrows or click on a line in the table to move between the data feed records. Scroll down to view additional fields within the selected record.

Modifying Data Feed column settings (QL Server Data Feeds only)
QL Server Data Feed columns can be renamed and two types of data can be selected (Text/Image).
- To change these selections, click on a column header. Assign a name to the column in the Name field. Next, and optionally, select the type of information the column will store (the default is text).
- You can leave the column name as a letter (default value) or enter a descriptive name, like "item name", “price” or “photo”.
- Click Save to confirm.

Changing the content assigned to a Image field (QL Server Data Feeds only)
To upload a new photo or graphic into an image field:
- Double-click in an empty image cell and the Windows File Manager will open.
- Select and image to upload. It will be assigned to the currently selected cell.

You can see a larger view of your images in the Record View on the right. Note you may have to scroll down to see the image depending on the number of other fields in the record.

To change the photo or graphic assigned to an image field:
Double-click the image you wish to change either in the data feed's cell or the larger image in the Record View.

To delete the photo or graphic assigned to an image field:
Click once on the image you wish to delete either in the data feed's cell or the larger image in the Record View. and hit the delete [del] key.
