Properties (on-premise)
To access this option, select Main Menu > Server > Properties

QL Server Properties (Screen 1)
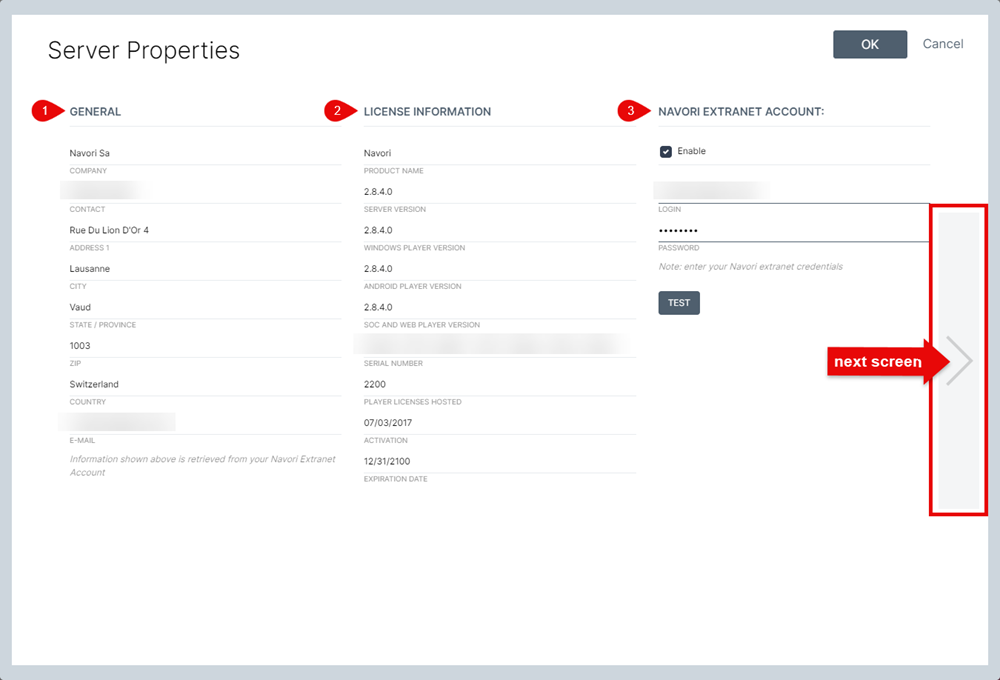
1. GENERAL
This is your contact information retrieved from the Navori Extranet. This information cannot be edited in the software. Change requests must be made via Support Ticket.
2. LICENSE INFORMATION
This is information about the software installed on your server, retrieved from the Navori Extranet. It includes your QL Server Serial Number. This information cannot be edited in the software.
3. NAVORI EXTRANET ACCOUNT
This is where you configure your Navori Extranet user login information. Entering/validating the information in this section is important as it lets your QL Server communicate with the Navori Extranet to retrieve software licenses and download software patches/updates. If this information is invalid, or if the Enable connection check-box is not selected, you will not be able to retrieve new player licenses or receive software updates.
QL Server Properties (Screen 2)
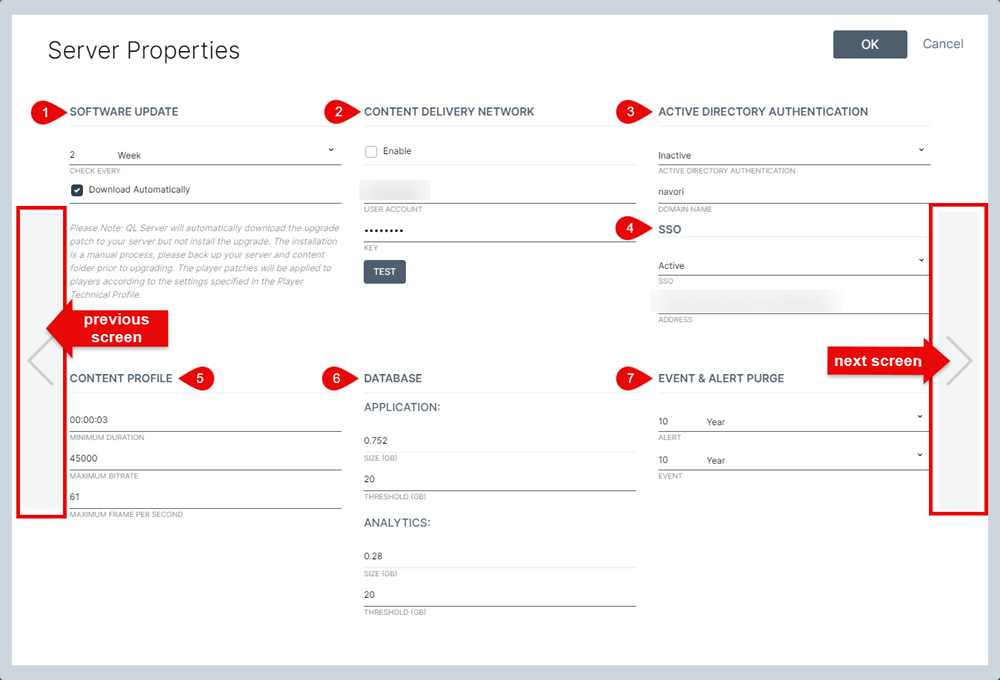
1. SOFTWARE UPDATES
When you enable this option, your QL Server will communicate with the Navori Extranet at the scheduled cycle to check for new software patches and updates. If the Download Automatically option is selected, new software update installers will be downloaded to your server as soon as they become available. It will be up to the QL Server administrator to install the new version at a time of their choosing.
IMPORTANT: This does not mean QL Server will update automatically. Only the installer software will be downloaded and an administrator will need to intervene to perform the update.
2. CONTENT DELIVERY NETWORK
This is where you enable CDN support for your QL server. You must select the Enable box and enter your CDN User Account login and Key to activate the feature.
3. ACTIVE DIRECTORY AUTHENTICATION
This is where you enable Active Directory support. Enter your Active Directory Authentication credentials and domain name in the appropriate fields.
4. SSO
Select "Active" to enable SSO support and enter your METADATA Address.
5. CONTENT PROFILE
These settings let QL Administrators control the type of content that is approved for the server. For example, when you set a Minimum Duration, no content below that duration will be allowed.
Same goes for Maximum Bitrate, and Maximum Frames Per Second (both refer to video content). The minimum duration is one second; minimum bitrate is 1,000 and maximum is 75,000; minimum FPS is 9 and maximum is 61.
NOTE: The QL Server default settings were configured by Navori Labs' software engineers to ensure best performance, however you may modify these settings to match your individual requirements. Also, please note content that falls outside the permitted range will still upload to the server, however this content will be disabled regardless of the user’s profile.
6. DATABASE
This is where you can see the current size of the QL Server software application, and report (Analytics) database sizes. You also configure the maximum size of either database (Threshold value). An alert will be triggered, if either value exceeds the threshold.
PLEASE NOTE: Whenever the report database size exceeds the threshold value, the server purges all old reports up to the previous month. Only the previous month’s data is retained after a database purge. Anyone who wishes to archive their old reporting data can use the Export feature periodically and save a local copy as a CSV file.
7. EVENT & ALERT PURGE
These settings let you set the player event and alert database purge interval. The default value is every month and you can edit these values as required. It’s important to purge these databases periodically.
QL Server Properties (Screen 3)
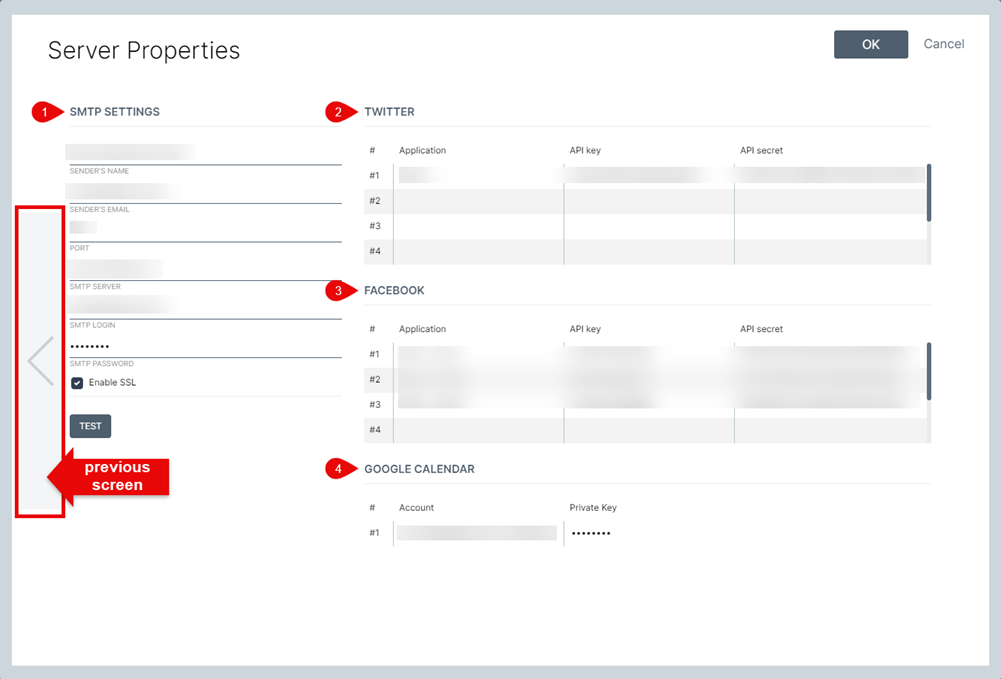
1. SMTP SETTINGS
QL Server administrators must configure these settings so the server can send out alert emails to users. Administrators must begin by creating an SMTP email account for QL Server’s use and then enter the information in these fields. SSL is supported and you can validate your settings by clicking the TEST button.
2. TWITTER
In order to display data feeds from Twitter, you must configure the settings in this table. Click here for step-by-step instructions.
3. FACEBOOK
In order to display data feeds from Facebook, you must configure the settings in this table. Click here for step-by-step instructions.
4. GOOGLE CALENDAR
In order to display data feeds from Google Calendars , you must configure the settings in this table. Click here for step-by-step instructions.