Player Alerts
Players can display 4 different status colors (gray, green, yellow or red).
Status indicators change colors automatically. For example, a new unassigned player license status will change from gray to green when the license has been activated and a player sends its first signal back to the server. Also, an online player that loses its network connection, or is turned off will automatically change its status from green to red. The cycle is reversed once the player gets back online and the status indicator switches back to green.
Yellow alerts are the exception to the rule. A player’s status indicator turns yellow to announce an alert and once the indicator goes yellow, it will remain in that state until either the player is shut down/disconnected from the network, or when the user resets (clears) the alert. Clearing a yellow alert restores the player to a green state so this step should only be performed when the cause of the alert has been corrected. However, if the issue hasn’t been resolved, the status will return to yellow at a later point and the alert counter will increment accordingly.

Yellow alerts are triggered by the following issues:
- Player software has unexpectedly stopped.
- No content scheduled in the grid. The player is currently showing the default media.
- No data feed available. The server publishing this feed is no longer reachable.
- Player’s available free storage space is under its programmed threshold.
- Player software has automatically restarted or the player has rebooted on its own to correct an issue (caused by depleted resources, or other unforeseen circumstance).
- Content ignored – not playable (for example, unrecognized video codec or corrupt media file). In these situation the content is skipped by the player but the status changes to alert the user.
It’s important to note that many errors can be detected over time, while the player is displaying a yellow alert status. This is where the alert counter comes into play.
The counter is shown in the monitoring window. It’s in the PLAYER column to the right of the status indicator.

Click the Clear alerts button to reset all yellow alerts back to green. If the issue has not been resolved, the status will revert to yellow once it's detected again.

Resetting Alerts
Yellow alerts can be reset in multiple ways:
- By clicking the Clear Alert button as described above.
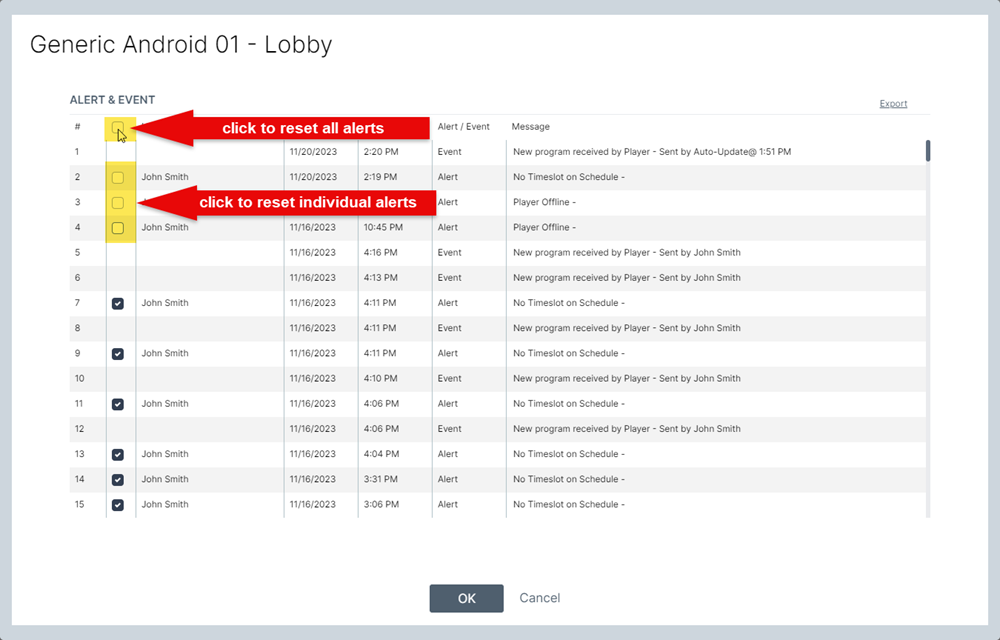
- By opening the Alert & Event window and selecting the Reset All box at the top of the table.
All the alerts will be reset and the player status will turn green. The alert counter will be reset to 0. - By opening the Alert & Event window and selecting individual alert check boxes in the table.
If you don't select all the alerts, the player status will remain yellow and the counter will show there are unchecked alerts.
What are Events?
Events are part of the normal, day to day operation of the player. Events are are recorded in the Alert & Event table for future reference.
Here is a list of events that will be recorded:
- Player has received a new program.
- Screen has been turned ON or OFF.
- Player software has been updated.
- Content is waiting to be approved.
What are Alert and Event Profiles?
Administrators control which type of alerts and events users can see and receive. For example, a IT specialist would require access to technical alerts and events.
A person in charge of content requires access to content related alerts and events.This information is recorded in the user’s assigned alert and event profile.
Administrators have total control over profiles and can even create custom profiles if required.
Email Alerts
Users can automatically receive an email each time a player reports an alert. Emails will list the nature of the alert and include the name of any content that is triggering the error.
Here is a list of email alerts that are sent out by the server:
PLAYER OFFLINE (CODE: A-01-01)
This alert is sent out when a player is offline.
DOWNLOAD ERROR (CODE: A-01-02)
This alert is sent out when a player has failed to download a file.
ABNORMAL TERMINATION (CODE: A-02-01)
This alert is sent out when a player has been shut down unexpectedly due to an unplanned PC/Android media player reboot or hardware crash.
NO TIMESLOT ON SCHEDULE (CODE: A-02-02)
This alert is sent out when a player has no programming scheduled for the current day or if the player has run out of programming
(exceeded the number of days without an update as per MENU > Tools > Player Technical Profile > Planning).
CONTENT PLAYBACK ERROR (CODE: A-02-03)
This alert is sent out when any content is skipped by a player because it could not be played
(for example: Player received a video file encoded with an unsupported codec so it skipped the item).
In order to send out email alerts, the server must be configured with a valid SMTP email account. Also, user accounts must include a valid email address. Lastly, the “send email” option must be enabled in the User Account settings.